How to Clear Cache on Kodi: A Step-by-Step Guide for Kodi Users
“Stop the horror of Kodi Buffering. Learn how to clear cache on Kodi now.”
Kodi is one of my top favorite media centers for streaming movies, audio, and TV shows. As you must already know, Kodi is an open-source media center software which is free to download on a variety of devices like your smartphones, tablets, laptops and even your Smart TVs.
With a fully-configurable and customizable interface, Kodi supports a variety of add-ons for Live TV shows, movies, sports and even for customizing how it looks using Skin add-ons. Now, of course, all Kodi users know when I say Kodi is the best.
But, there’s a slight problem!
If you’re a long-time Kodi user, you must be knowing that Kodi tends to get slow over time. Perhaps it’s your network issues or there is a problem within Kodi? For both your situations I can help you.
Let’s go with the first one.
Do you know that many times your network issues or low-speed connectivity occurs because the server is far away from the streaming source? Of course, you can’t pack your stuff and move to Korea, if you’re watching a Korean show. So what other option do you have?
It’s simple, just download a good VPN like IPVanish. It is a Tier-1 VPN software that’ll give you access to unlimited bandwidth and increase your data speed as well.
Furthermore, you are advised to use a strong VPN whenever you use Kodi for a safe and secure browsing experience.
Before You Go Ahead, Get Secure
Before you go ahead and use Kodi, it is advisable to download a VPN for your Kodi. A VPN will keep you safe and secure while you stream away and watch your favorite movies online. With a Kodi VPN software on your system, all ISP limitations can be circumvented and you can enjoy access to unlimited and media content and avoid copyright/infringement notices.
Also, your video stream speed will increase and you’ll definitely want that to enjoy more movies in lesser time. So don’t wait up and download the best Kodi VPN today. For a fully-featured Kodi VPN, you can download IPVanish today. It comes highly recommended and is priced at only $6.49/month for 1 year.
Be a part of the Tier-1 VPN- IPVanish Today!
Now, coming to our second problem, what if something is wrong within Kodi. Well, let me tell you. It is actually quite a small issue than you think.
Want to know what is causing Kodi Buffering?
As you might have already guessed from the title of the post, the culprit is your Kodi Cache.
Now from here on I’ll tell you about 5 types of Kodi Cache, why you should clean it and needless to say, how to clear cache on Kodi.
Let’s proceed…
Here are the Five Types of Cache in Kodi
Mainly there are five types of cache in Kodi that are discussed below:
1. Video Cache
By default, Kodi allocates 20 MB of RAM space to each video add-on so that your video streaming experience is smooth and flawless. For reducing the buffering, Kodi saves some of the bytes of the video in this cache.
Now the good part here is that you don’t have to clear video cache because it gets disappeared as soon as you stop streaming the video.
2. Add-on Cache
Some Add-ons override the default settings of Kodi and create their own specific cache folders to save data bits for later use like wallpapers, images, logos and additional resources.
Although most add-ons clean up their cache but some of them do not. Therefore, you need to clean up the cache created by these add-ons using a Kodi cache cleaner.
3. Image Cache
There are some add-ons that have a multi-source stream. When you use these add-ons, Kodi goes through various scraper databases and may download images and album art that gets stored in image cache folder.
Since these images are stored in a compressed format, they don’t take up much space. But if you’re a hoarder of media and videos, you might find quite a lot of junk there.
So, it’d be a better practice to clean up this image cache at regular intervals.
4. Temp Cache
This is essentially a folder where all your miscellaneous Kodi files are located. From your temp files to old add-on versions, everything is dumped here. So, you should indeed be cleaning it up.
5. Android Applications Cache
If you have Kodi installed on an Android device, you might have to clean up the android application cache from time to time. Although this cache doesn’t clog up your memory, you should be using a cache cleaning utility app like Super Cleaner for your Android.
Once you clean cache from your phone or tablet, Kodi will automatically replace the old files with some new ones. So, download a cache cleaner app to clear cache from Kodi on Android now.
Why Should You Clear Cache on Kodi?
As we have discussed above, Kodi collects cache for a good reason to avoid Kodi Buffering. Yes, it’s simple and understandable. But then why should you learn how to clear cache on Kodi?
Unless you’re using an Android device that’ll clear Kodi cache automatically when you clean up the device cache, you need to know how to clear Kodi cache.
You see the cache like add-on cache, temp files can slow down your system and affect Kodi’s performance. So, to keep Kodi up and running brilliantly as it is supposed to work, you need to clear Kodi cache.
Let’s find out how we can overcome buffering issues that are caused as a result of full storage with a step by step guide of clearing cache on Kodi.
How to clear Cache on Kodi?
To clear cache in Kodi, you need to have a program add-on. Because there are abundant program add-ons, it can be a difficult choice to make. Moreover, some of the famous Kodi Program add-on repositories have shut down. So you won’t find the ever so popular Xfinity and Indigo Kodi cache cleaners anymore.
Integrated with Kodi Maintenance tools, these add-ons were good till they were there. But until they come up again, we have another strong Kodi program add-on that works great as a Kodi cache cleaner.
Known by the name Merlin auto cleaner, this tool will clean your Kodi cache automatically whenever you’ll start Kodi.
P.S. The steps to clean up cache are same for all Kodi Versions, be it Jarvis or Krypton. Because I have Kodi Krypton on my PC, we’ll be learning how to clear cache on Kodi 17 Krypton.
Remember, it’ll remain quite similar if you are using Kodi 16 Jarvis.
Follow the Steps Outlined Below to know How to Clear Kodi Cache:
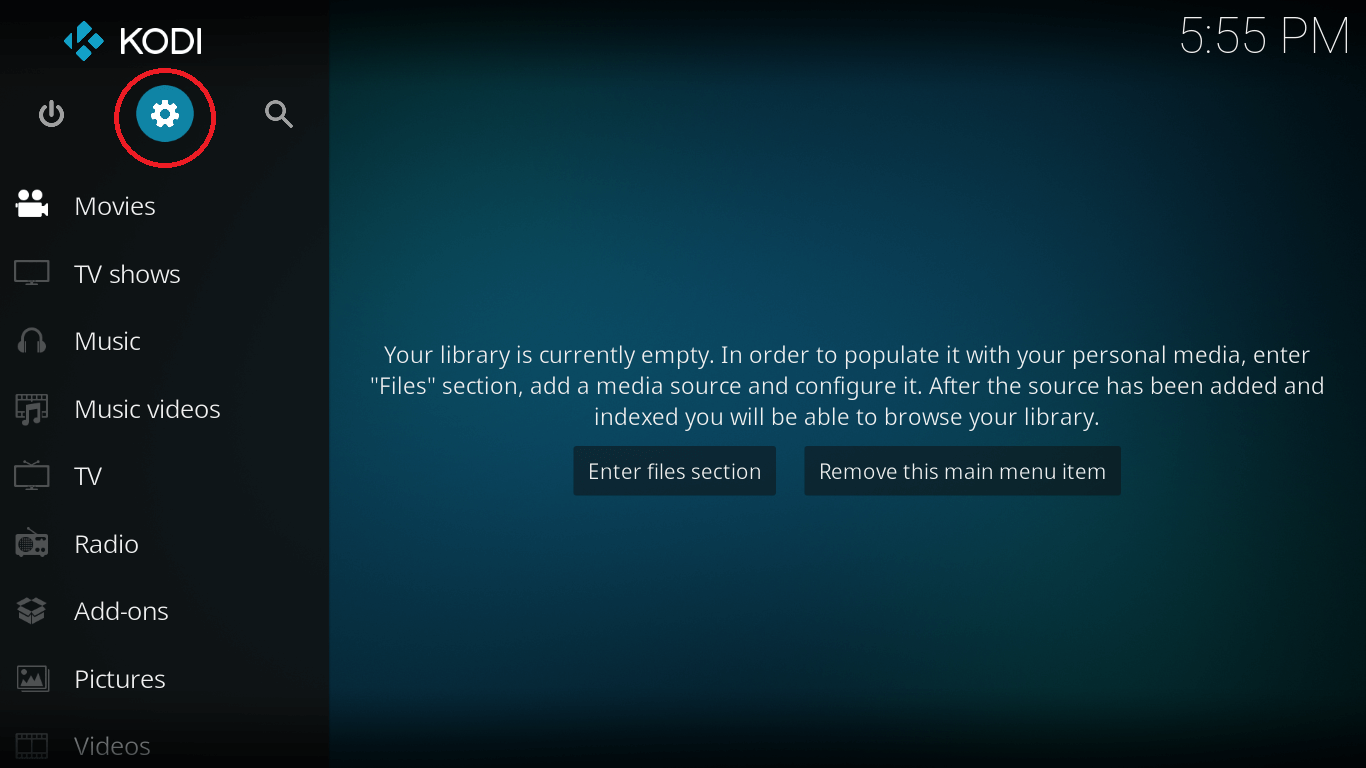
- Open Kodi and select Settings.
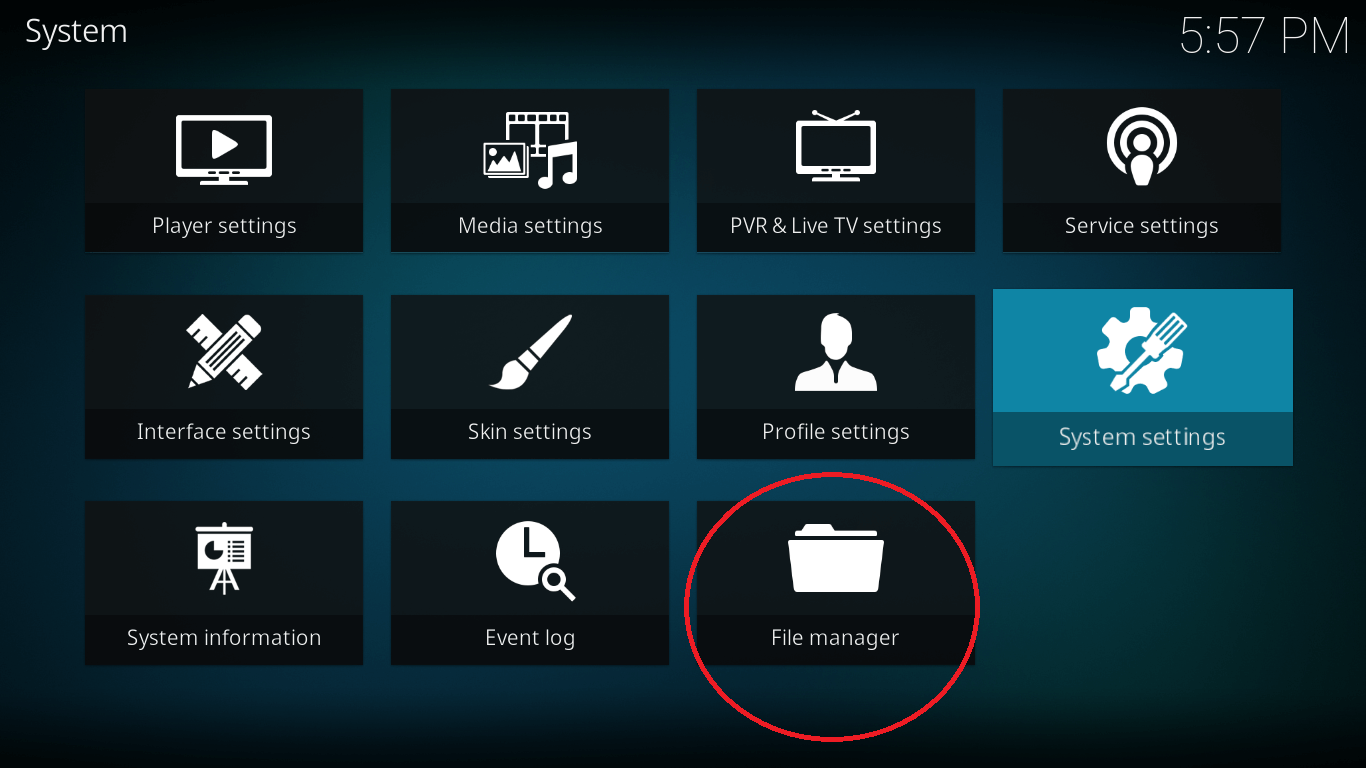
- Now go to File Manager option and click on Add-ons.
- Click Add Source> None. Now type the URL: http://mwiz.co.uk/repo/. Make sure you type in the exact same URL and then click OK.
- Type in the Media Source name as “Merlin Cleaner” and click OK.
- Now navigate to the main menu of Kodi. Select Add-ons. From here, select package installer icon (looks like an open box) located at the top left corner of the screen.
- Click on Install from zip file option. Select the file named repository.merlin.zip and click Ok.
- Once the repository is installed, Select Install from Repository option.
- Now, select your Merlin Cleaner Repository File and go to Program Add-ons.
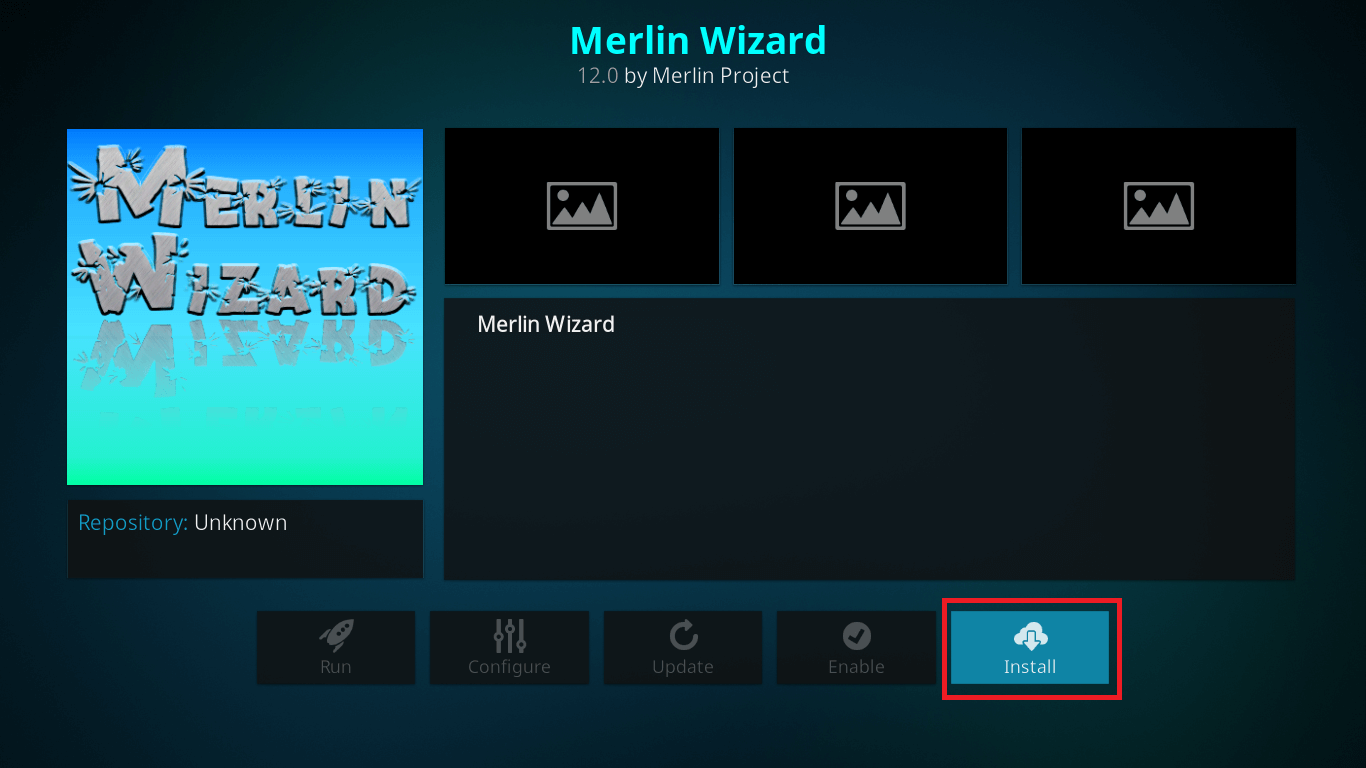
- It has a lot of program add-ons that can make Kodi work more faster and help in improving other Kodi functionalities. But for deleting cache, select Merlin Wizard.
- Click on Install and wait for a few minutes to enable the add-on.
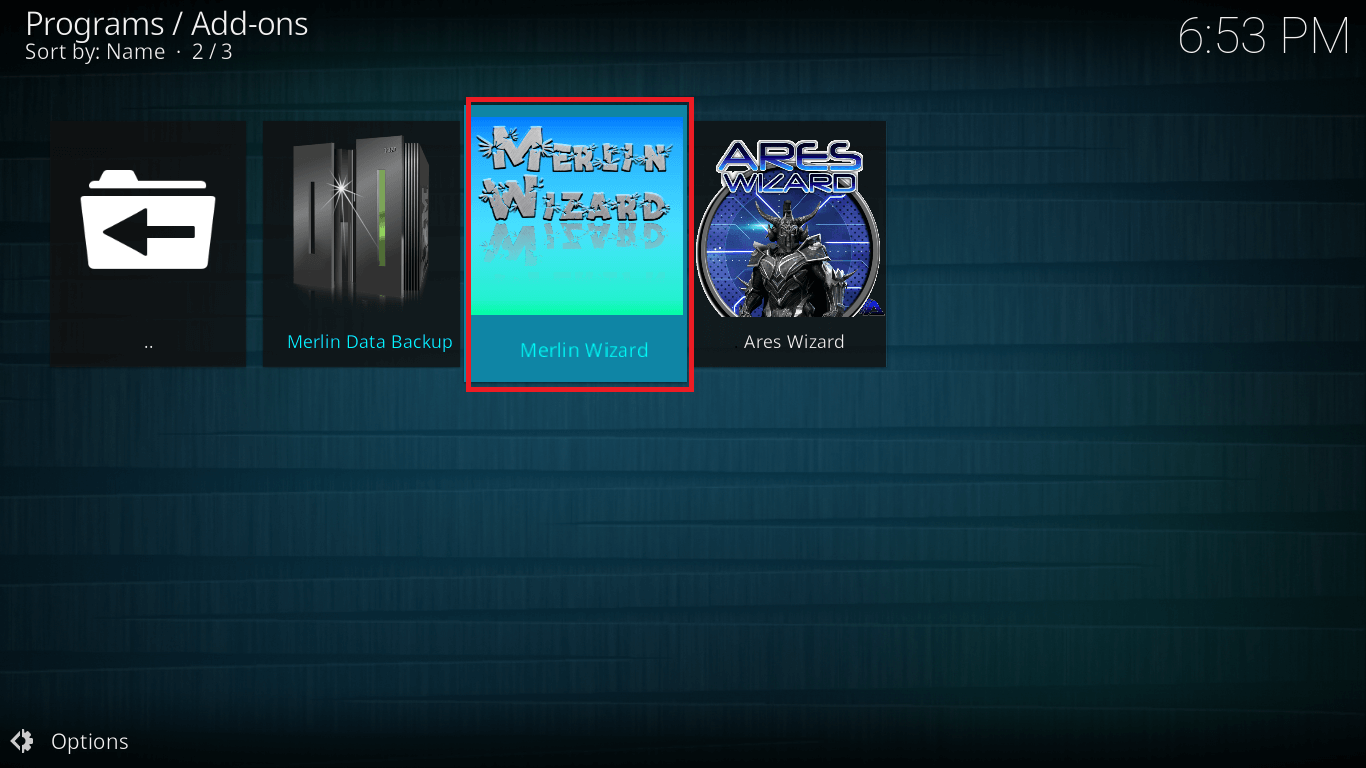
- Now go back to the main menu of Kodi and navigate to Add-ons> Program Add-ons.
- Here, you’ll find your addon that’ll clear the Kodi cache for you. Go to Merlin Wizard.
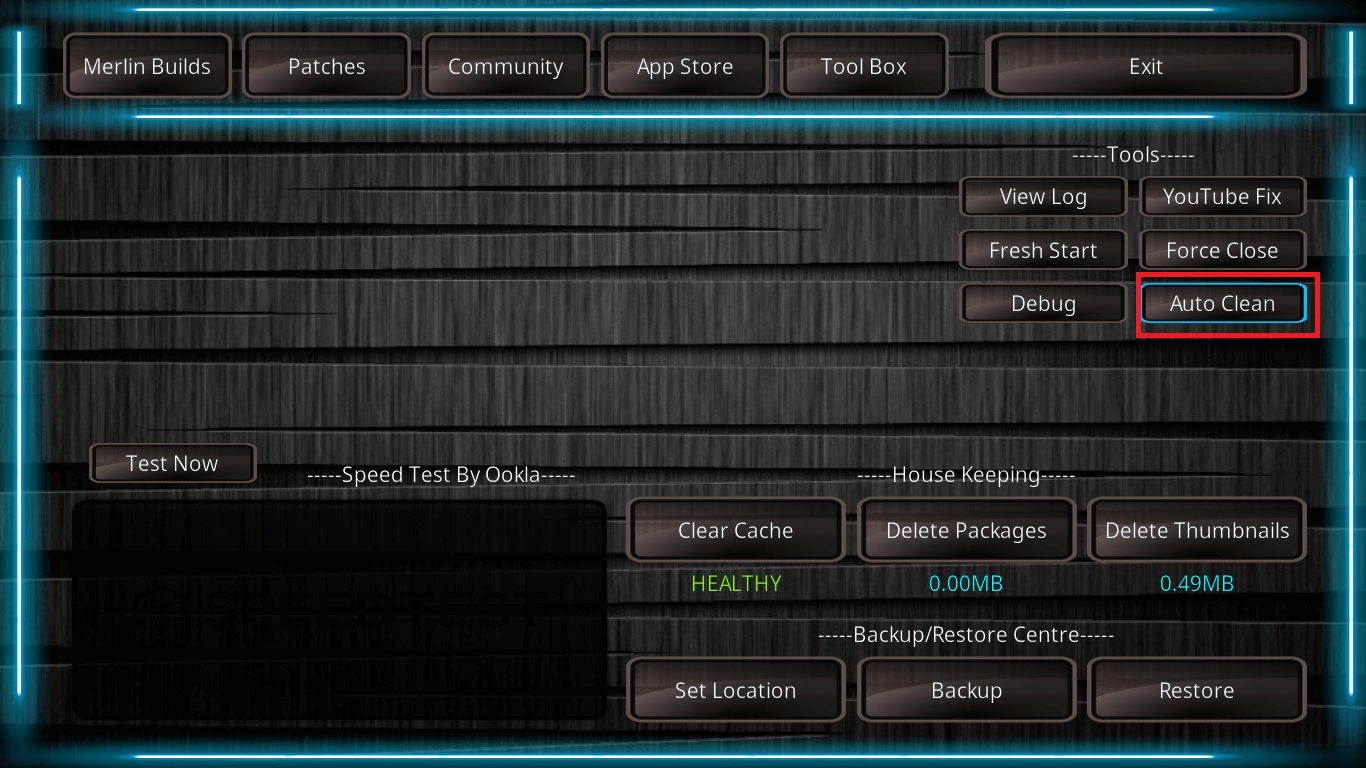
- Go to Toolbox>select Auto Clean.
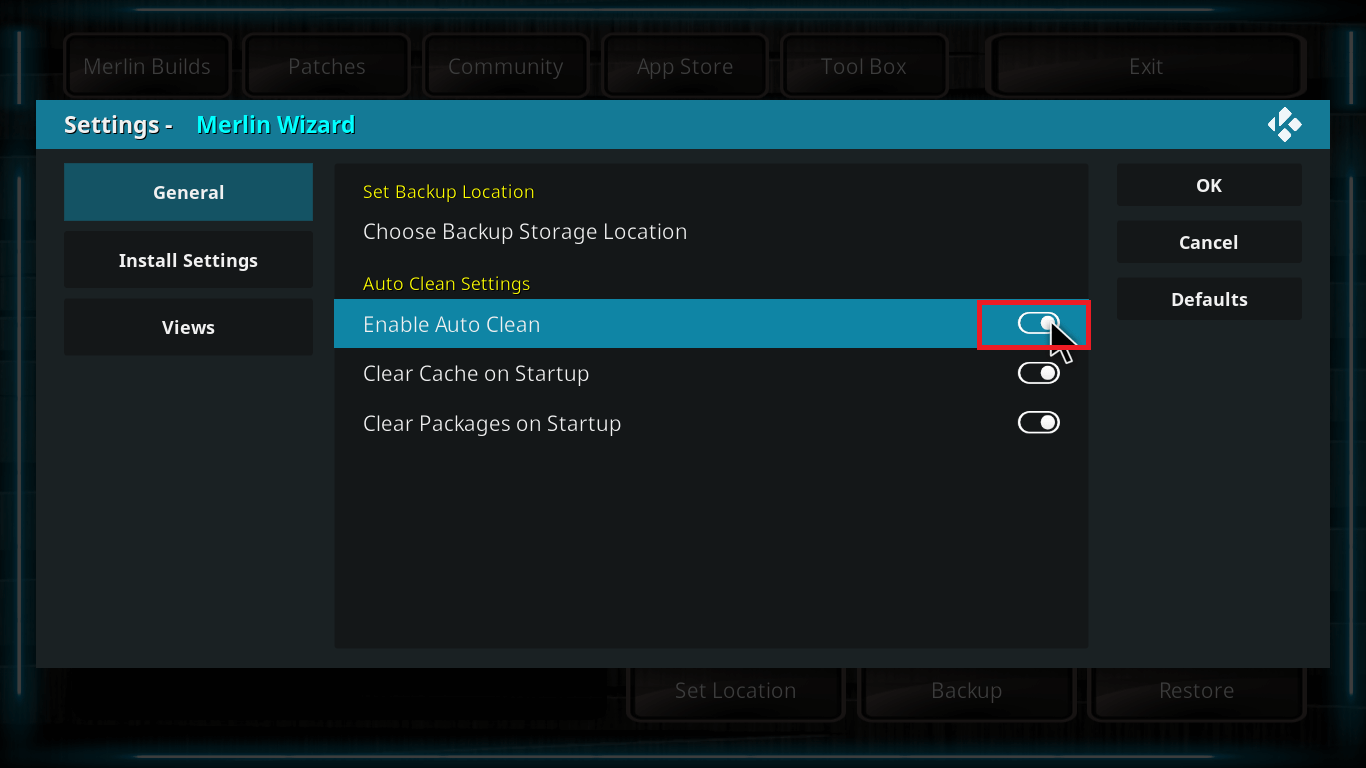
- A dialog box will appear on screen. Turn on the two options present: Enable Auto Clean, Clear Cache on Startup and Clear Packages on Startup.
- Click Ok. Your work is done and now when you’ll start up Kodi, this add-on will clear Kodi cache automatically.


Time to Sign Off
I hope you found this step by step guide on how to clear cache on Kodi useful. With this guide, you won’t have to clear Kodi cache manually as it’ll delete all the cache automatically.
Just go ahead with these steps and never encounter buffering issues due to full storage issues in Kodi.
Till then, Happy Streaming fellow Kodians!

